From Bioblast
 |
Oxygen sensor test |
MitoPedia O2k and high-resolution respirometry:
O2k-Open Support
Description
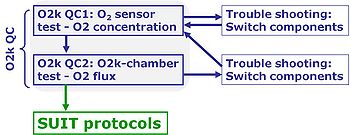
The O2 sensor test is an important component of Oroboros Quality Management. The OroboPOS test is described in detail in MiPNet06.03 POS-calibration-SOP, is performed after switching on the Oroboros O2k, and is required as a basis of technical service of the instrument.
Abbreviation: POS test
Reference: MiPNet06.03 POS-calibration-SOP, MiPNet19.18B POS-service, MiPNet19.03 O2k-cleaning and ISS
MitoPedia O2k and high-resolution respirometry:
O2k-Open Support
Calibration and quality control
- Oxygen sensor test
- The oxygen sensor test starts in an open chamber.
- 1. Before final equilibration, perform a stirrer test [F9], switching both stirrers automatically off for 30 s.
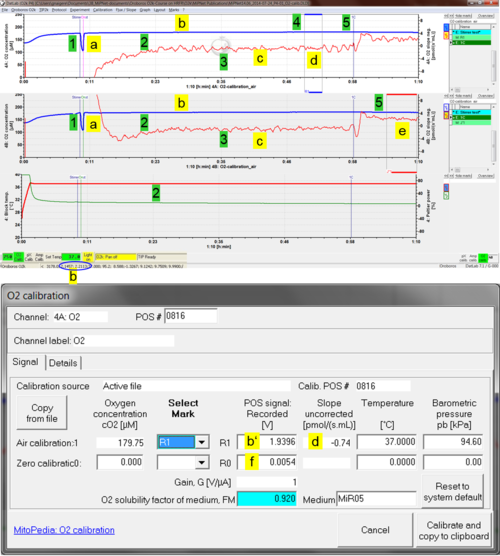
- 2. About 20 minutes are required for air equilibration after temperature equilibration of the incubation medium, visualized as stabilization of the Peltier power (Fig. Quality control; time scale is 01:10 hh:mm).
- Quality control label a: Upon automatic re-start of the stirrer (On), the increase of the oxygen signal should be rapid and monoexponential.
- Quality control label b: The raw signal (blue plot; 1 V = 1 µA at Gain 1) should be 1 to 3 V at 25 to 37 °C at sea level up to 1000 m (pb 101 to 90 kPa). At a Gain setting of 2 the raw signal [V] is multiplied by 2.
- 3. Within 40 minutes, the oxygen signals should be stable with an O2 slope (uncorrected) close to zero.
- Quality control label c: Signal noise should be low, reflected in a noise of the O2 slope (red plot) within ± 2 (± 4 is acceptable) pmol∙s−1∙mL−1 at a data recording interval of 2 s and 40 data points selected for calculation of the slope.
- 4. Set a mark on the oxygen signal (R1) and click on O2 Calib. to open the DatLab O2 calibration window (MiPNet06.03 POS-calibration-SOP).
- Quality control label d: The slope uncorrected should be within ± 1 pmol∙s−1∙mL−1 averaged across the section of the experiment marked as R1 for air calibration (d). The recorded POS signal should be close to the previous calibration under identical experimental conditions. See O2-Calibration window (see Fig. right, label b’).
- 5. Close the chamber and if required, perform a zero oxygen calibration.
- Quality control label e: After closing the chamber, select plot Y2 and set mark J°1. O2 slope neg. should be within 3.0 ± 1 pmol∙s−1∙mL−1.
- O2 slope neg. values higher than 4.0 pmol∙s−1∙mL−1 indicate:
- » Biological contamination.
- » Air bubbles in the Closed chamber: switch on the illumination of the O2k and inspect the O2k-Chamber through the front window. Remove any air bubbles.
- » A large volume of medium collected in the receptacle of the stopper: siphon off excess medium.
- » A larger chamber volume: check O2k-Chamber volume calibration.
- O2 slope neg. values higher than 4.0 pmol∙s−1∙mL−1 indicate:
- Quality control label f: The zero signal at mark R0 for zero calibration should be <2 % of R1 (stable at <5 % is acceptable).
- 3. Within 40 minutes, the oxygen signals should be stable with an O2 slope (uncorrected) close to zero.
Troubleshooting
General
- The O2 sensor test does not only serve to evaluate the function of the OroboPOS, but many other components of the O2k have to function according to specifications for a high-resolution oxygen signal to be obtained:
- USB-Cable 2.0\Type A-B not properly connected to the O2k and PC or Laptop.
- O2k-Chamber not properly positioned, such that O2 sensors are not connected to the medium.
- OroboPOS-Membranes defective or not properly applied.
- OroboPOS-Connector contaminated gold contacts; plugs not properly connected to the sockets of the O2k-Main Unit.
- OroboPOS contacts not cleaned. In rare cases, Pen-Contact Oil might be used.
- OroboPOS-Electrolyte Powder contaminated, inappropriate water used for dissolving the powder.
- O2-Zero Powder not properly handled; confused with OroboPOS-Polishing Powder.
- OroboPOS not properly serviced; not properly mounted to the OroboPOS-Connector; or defective POS head.
- Room temperature not sufficiently stable.
- Stirrer-Bar\white PVDF\15x6 mm not added to the chamber, or stuck and not rotating.
- O2k-Barometric Pressure Transducer not properly calibrated.
- O2k-Peltier Temperature Control defective electronics.
- O2k-Electromagnetic Stirrer Twin-Control defective electronics.
- O2k-Main Basic not properly connected; other defective hardware.
Off-scale signal
- If the signal remains off scale (9.99 V) or very low (< 1 V) at air saturation (25 to 37 °C; lower signals at lower temperatures): Many components may be responsible, and an electronic defect of the O2k-Main Unit must be carefully excluded.
- Check settings for Gain (use Gain 1) and Polarization voltage (use 800 mV). If these settings were incorrect, the off-scale problem may be solved simply by using the standard settings.
- Empty the chamber with the O2k running and connected to DatLab. Switch the stirrer off. Remove theOroboPOS from the chamber. Leave the sensor attached to the OroboPOS-Connector, and the OroboPOS-Connector plugged into the O2k-Main Unit. Record the signal for some minutes. The raw signal should normalize to a value >1 V and <3 V (Gain 1). If so, the O2k-Chamber assembly was problematic (application problem), and re-assembly will solve the problem. » O2k-Videosupport: Insert O2k-Chamber.
- Remove the sensor head from the sensor connector, which remains plugged into the O2k-Main Unit. If the raw signal is not stable at 0 V, a defect of the OroboPOS-Connector is indicated.
- Only for O2k-Series D and higher: Unplug the OroboPOS-Connector from the O2k-Main Unit. The signal should be in the range of ± 0.00099 V (Gain 1), otherwise an electronic problem of the O2k-Main Unit is indicated. For O2k-Series A-C please contact O2k-Tech Support
- If the signal remains off scale (9.99 V) or very low (< 1 V) at air saturation (25 to 37 °C; lower signals at lower temperatures): Many components may be responsible, and an electronic defect of the O2k-Main Unit must be carefully excluded.
Switch components approach
- If specifications given in the POS-SOP are not obtained: switch components for locating the problem.
- The two chamber design of the O2k has many benefits, including advantages in troubleshooting. By switching components between sides A and B of the O2k, it is usually possible to locate an instrumental problem, finding selectively a specific defective component of the O2k. This component can then be serviced by the user or replaced by Oroboros Instruments without the need to ship the entire O2k.
- For O2k-Series D and higher please follow the switch components troubleshooting approach (for O2k-Series A-C please contact O2k-Tech Support):
- 1 During the switch components troubleshooting, different configurations in which the OroboPOS and OroboPOS-Connectors are switched between chambers to locate the problem. Start with the original configuration (do not swap any component before starting).
- a. Fill the O2k-chambers with medium or water and perform Oxygen_calibration_-_DatLab following the SOP as in MiPNet06.03_POS-calibration-SOP.
- b. After completing the step above and setting the marks R1 and J°1, keep recording the file and siphon off medium from the O2k-chambers. Mark this event (F4) and describe it in the 'Event' window.
- c. Detach the OroboPOS-Connectors from each chamber and remove the OroboPOS from each OroboPOS-Connector. When disconnecting a sensor from the OroboPOS-Connector, prevent damage by electrostatic discharge by following the guidelines: MiPNet14.01 ESD-damage. It is not necessary to remove the seal tip and the mounted membrane from the OroboPOS. This is a good opportunity to clean the gold contacts of the OroboPOS-Connectors and sensors: Cleaning the electrical connections.
- 2 Switch only the OroboPOS between O2k-chambers A and B, keeping the same OroboPOS-Connector for each chamber. Create an event and name it as Sensors swapped. Repeat steps a, b and c.
- 3 Switch only the OroboPOS-Connector between O2k-chambers A and B. Do not switch the OroboPOS location from the previous setup. Create an event and name it as Connectors swapped. Repeat steps a, b and c.
- 4 Switch only the OroboPOS between O2k-chambers A and B, keeping the same OroboPOS-Connector location from the previous setup. Create an event and name it as Sensors swapped. Repeat steps a, b and c.
- 5 Switch only the OroboPOS-Connector between O2k-chambers A and B. Do not switch the OroboPOS location from the previous setup i.e., OroboPOS and OroboPOS-Connector in their original O2k-chambers. In this way, you will return to the original setup. Create an event and name it as Connectors swapped. Repeat steps a, b and c.
- 1 During the switch components troubleshooting, different configurations in which the OroboPOS and OroboPOS-Connectors are switched between chambers to locate the problem. Start with the original configuration (do not swap any component before starting).
- For O2k-Series D and higher please follow the switch components troubleshooting approach (for O2k-Series A-C please contact O2k-Tech Support):
Overview on Switch components troubleshoot approach:
| Configuration # | Chamber | OroboPOS | OroboPOS-Connector | Mark on 'Y1: O2 concentration' | Mark on 'Y2: O2 slope neg.' |
|---|---|---|---|---|---|
| 1 (original setup) | A | A | A | R1-01 | J°1-01 |
| B | B | B | R1-01 | J°1-01 | |
| 2 | A | B | A | R1-02 | J°1-02 |
| B | A | B | R1-02 | J°1-02 | |
| 3 | A | B | B | R1-03 | J°1-03 |
| B | A | A | R1-03 | J°1-03 | |
| 4 | A | A | B | R1-04 | J°1-04 |
| B | B | A | R1-04 | J°1-04 | |
| 5 (original setup) | A | A | A | R1-05 | J°1-05 |
| B | B | B | R1-05 | J°1-05 |
- Customer ID: DE_Seewiesen_Casagrande_S
- Question:
- We have a problem located in the O2k-Chamber B, its OroboPOS is not providing the recommendation specifications of MiPNet06.03_POS-calibration-SOP. I am attaching an image to visualize the issue. I have performed the POS service 6 times including cathode and anode cleaning as in O2k-Videosupport, OroboPOS-Holder exchange, O2k-Chamber disassembly followed by assembly, and stirrers exchange. Nevertheless, the signal is always very bad. The data is attached (2019-11-28).
- Answer:
- 1. To discern the origin of your observed noisy signal - could you perform a switch approach by recording the QC1: Oxygen sensor test within one measurement DLD file including switch of the OroboPOS between chamber A and B, 'ie.':
- O2k-Chamber A with OroboPOS A + OroboPOS-Connector A and O2k-Chamber B with OroboPOS B + OroboPOS-Connector B followed by
- O2k-Chamber A with OroboPOS B + OroboPOS-Connector B and O2k-Chamber B with OroboPOS A + OroboPOS-Connector A followed by
- O2k-Chamber A with OroboPOS B + OroboPOS-Connector A and O2k-Chamber B with OroboPOS A + OroboPOS-Connector B followed by
- O2k-Chamber A with OroboPOS A + OroboPOS-Connector B and O2k-Chamber B with OroboPOS B + OroboPOS-Connector A.
- 2. Perform a complete POS-service (including cathode cleaning, anode cleaning, dry the connector with a clean and dry tissue after the service) as explained in MiPNet06.03_POS-calibration-SOP.
- 3. Perform the QC1: Oxygen sensor test after the complete POS-service and send me the resulting files for further evaluation.
- Customer feedback
- Following the quality control tests I have obtained a drastic signal improvement. The data is attached (2020-01-13).
Keywords: Oxygen signal
- Bioblast links: Oxygen signal - >>>>>>> - Click on [Expand] or [Collapse] - >>>>>>>
- Specific
- O2k-Procedures
- MiPNet O2k-Procedures
- General
- » Oxygen, dioxygen, O2
- » Oxygen calibration - DatLab
- » Oxygen solubility
- » Oxygen solubility factor
- » Oxygen pressure
- » Concentration
- » Activity
- » Pressure - Pascal
- » Barometric pressure
- » High-resolution respirometry
- » OroboPOS
- » Polarographic oxygen sensor
- » MitoFit Quality Control System
- » Sensitivity
- General
- Other keyword lists
MitoPedia O2k and high-resolution respirometry: O2k hardware, DatLab, Oroboros QM


