DatLab
| Description | DatLab is the O2k-Software for Data Acquisition & Analysis, specifically developed for high-resolution respirometry with the Oxygraph-2k.
The newest DatLab version is included in the O2k-Core, and updates of DatLab are free of charge during the warranty period of the O2k. |
|---|---|
| Product ID | 20700 |
| Type | O2k, O2k-Core |
| Link | Previous Product ID 28001-44, DatLab @OROBOROS |
| Image |
DatLab 5
After many years of gradual change of DatLab 4 the multiple challenges from the increased use of MultiSensor applications prompted us to develop a new generation of software for the O2k: DatLab 5
Because the internal structure of DatLab 4 was becoming to inflexible for new features, DatLab 5 was completely rewritten. This required also a change in the file format for DatLab files, see "Compatibility" below. However, for the first release of DatLab 5 the user interface of DatLab 4 was basically recreated in DatLab 5, with as yet just a few new features. Therefore, the DatLab 4-Guide is still valid and can be consulted for help in using DatLab 5.
Compatibility with DatLab 4
DatLab 5 is downwards compatible with DatLab 4.2 and higher. DatLab 5 can read all files generated by DatLab 4.2 and higher. However, DatLab 5 will save these files always in the DatLab 5 format. Afterwards, these files will no longer be readable by DatLab 4. Therefore, we recommend doing a complete transition from DatLab 4 to DatLab 5, upgrading all computers. However, there is no need to mass convert the old DatLab 4 files. They can stay in the DatLab 4 format and will be converted by DatLab 5 when necessary. At the moment files created with DatLab 4.1 have first to be opened and saved with DatLab 4.3 before they can be opened with DatLab 5.
Upgrading from DatLab 4 to DatLab 5
DatLab 5 can be installed over DatLab 4 (recommended option). In this case all DatLab files will be kept, but some layouts may be overwritten.
Installing DatLab 5
- Get Datlab5:
- from www.oroboros.at: When you are eligible to a free upgrade to Datlab5 our administration ([email protected]) will supply you with a login code. Use this code to log in at [1] and download "DL5Inst.exe" to your computer.
- from the "OROBOROS O2k-Course on HRR" (on a USB flash drive): using the file finder, click "Manual" and then use the link labeled "DL5-Install.exe" to start the installation process. (Alternatively, you can use the link in the column at the far right to navigate to the folder containing DL5Inst.exe. The full path name is "OROBOROS O2k-Course on HRR\O2k-Building Blocks\3.O2k-Manual\O2k-DatLab-Install".
- Start (double click) DL5Inst.exe.
- You may be asked to permit the installation by the Windows operating system.
- C:\DatLab will be suggested as installation directory. Usually this will be also be the directory used by DatLab4 and you can accept the suggestion.
- Select "type of installation" = "typical" this will keep your instrument specific setting (chamber labels, calibration parameters) but may overwrite some layouts.
- During the first start of DatLab 5 the information in any Datlab4.ini file in the same directory will be copied to Datlab5.ini, then Datlab4.ini will be deleted together with DatLab4.exe. The new executable file will be Datlab5.exe. A new desktop shortcut will be created, named "Oroboros DatLab". It may be necessary to manually delete any old shortcuts (icons) to Datlab4, if present.
If for some reason you want to use DatLab4 and DatLab5 on the same computer they have to be installed in two different directories. Known Issues: Windows 7: When selecting an alternative directory for installing DatLab (or creating a new directory by selecting a non existing directory) Windows 7 may respond with an error message. Ignore the error message and proceed.
New Features in DatLab 5.1
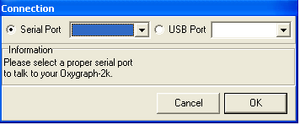
- DatLab 5 supports connecting the oxygraph to a computer via the computers USB port and a standard USB cable (requires O2k-Core or O2k Series E and above). Additionally, DatLab 5 still supports connection to a computer via the RS232 port. Therefore, it is possible and highly recommended to upgrade all oxygraphs in a lab to DatLab 5. When connecting to the O2k for the first time, the type of connection (USB or RS232) is set by radio buttons. When connecting via the USB port any detected oxygraphs will be identified by their serial number and can be selected in the drop down menu to the right of "USB Port". When connecting via the RS232 port the proper serial port "Com..." can be selected in the drop down menu to the right of "Serial Port".
- DatLab 5 allows to open DatLab files by double clicking them in the Windows file manager or similar programs. First time use: Double click any DatLab file in the Windows file manager, select "open this file type always with this program", select "browse", then navigate to the file Datlab5.exe. Usually this file will be in C:\Datlab\DatLab5.exe. Depending on your Windows settings the extension '.exe' may not be displayed: In this case you can differentiate between DatLab5.exe and DatLab5.ini by right clicking and selecting "properties". The exact procedure will depend on the version and language of your Windows operating system. After doing this once, Windows will always use DatLab 5 to open DatLab files.
- [Graph]/[Scaling]: It is possible to set the maximum value for the Y axis of a plot. When changing one or two parameters (minimum, maximum, or range) the remaining parameters will be adjusted automatically after pressing "OK" or clicking in a different field. Fill out only the fields Minimum and Range to simulate the behavior of DatLab 4.
- [Graph]/[Scaling]:It is possible to selectively copy scaling settings to other windows by using the "Apply to Graph 1", Apply to Graph 2", etc buttons. These buttons replace the "Apply to all" button. This will be helpful in MultiSensor applications when e.g. two windows should show oxygen plots (with identical scaling) and two windows should show fluorescence plots (with identical scaling).
- The number of points used for slope calculations can now be changed for the pX and the Amp channels. Select [MultiSensor]/[MS Calibration]: Slope N: Select the number of data points (N = 40 to N = 5 in intervals of 5) used to calculate the slope. A high value of N yields a highly smoothed curve, whereas a low value of N improves time resolution.
- The slopes for the pX and Amp channel are now calculated with the correct sign for the first order time derivative. That is, if the calibrated signal decreases the slope will have a negative sign, if it increases the sign of the corresponding slope will be positive. The slope for the O2 channels is still calculated to give a positive sign for a decreasing signal, signifying a "positive " respiration.
- Proton production rates can be calculated on line. In the menu select [Plots]/[Proton Flux], see O2k-pH ISE-Module.
- The amperometric channel that, due to its main use for "NO electrodes", was labeled "NO" in DatLab 4 was renamed to "Amp" to reflect its versatile nature. It is used e.g. to record the data from the O2k-Fluorescence LED2-Module.
- Faster processing of DatLab Data (this required a larger minimum file size).
Technical Service:
Problems with exporting Data to text (csv) files
- Export data does not work for DatLab versions below 4.2.1
- Check that DatLab and the program you want to use the data in use the same character as a decimal separator
- Importing the csv files into spreadsheet programs: see discussion page
DatLab for Apple
- see discussion page


